How to Use Polyurethane Belt Cleaner in Conveyor
Polyurethane belt cleaners are essential for maintaining the efficiency and longevity of conveyor systems, especially in industrial settings where debris and material buildup can lead to decreased performance and increased maintenance costs. Below is a comprehensive guide on how to properly use a polyurethane belt cleaner in your conveyor system.
Step 1: Assess Your Conveyor System
Before installing a polyurethane belt cleaner, assess your conveyor system to determine the appropriate type and size of cleaner needed. Consider factors such as:
• Belt speed
• Material being conveyed
• Belt width
• Environmental conditions (e.g., temperature, humidity)
• Degree of material buildup expected
Step 2: Select the Right Belt Cleaner
Choose a polyurethane belt cleaner that matches the specifications of your conveyor. Consider the following:
• Type of Cleaner: Head pulley cleaners, tail pulley cleaners, or intermediate cleaners depending on where you need to remove the material.
• Polyurethane Grade: Select a grade that is resistant to the specific conditions of your conveyor (e.g., abrasion resistance, chemical resistance).
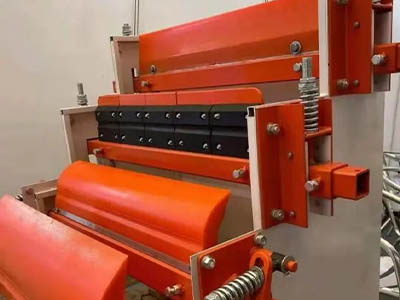
• Blade Configuration: Single blade or multi-blade systems based on the amount of material to be removed.
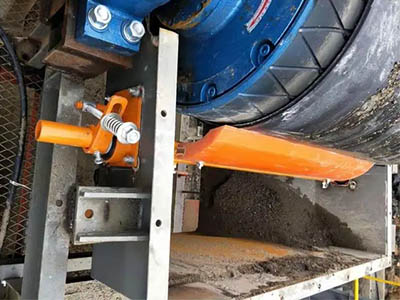
Step 3: Install the Belt Cleaner
Proper installation is crucial for the effective operation of a polyurethane belt cleaner. Follow these steps:
1. Shut Down the Conveyor: Turn off the conveyor system and ensure it is completely stopped before beginning installation.
2. Position the Cleaner: Place the cleaner at the desired location (typically near the head pulley for primary cleaners or at the tail pulley for secondary cleaners).
3. Adjust the Blade: Set the blade at the correct angle and pressure against the belt. The blade should make firm but not excessive contact with the belt to avoid damage.
4. Secure the Cleaner: Fasten the cleaner securely to the conveyor frame using the provided hardware.
Step 4: Test the Belt Cleaner
After installation, start the conveyor system and monitor the operation of the belt cleaner:
• Check that the cleaner is making proper contact with the belt without causing it to deviate.
• Observe the amount of material being removed.
• Adjust the blade pressure if necessary to optimize cleaning efficiency without damaging the belt.
Step 5: Regular Maintenance
Regular maintenance is key to the longevity and effectiveness of your polyurethane belt cleaner:
• Inspect the Blade: Regularly check the condition of the polyurethane blade. Replace worn or damaged blades promptly.
• Clean the Cleaner: Remove any debris or buildup from the cleaner to prevent it from becoming less effective.
• Lubricate Moving Parts: If your cleaner has any moving parts, apply lubrication to keep them functioning smoothly.
• Adjustments: Periodically check and adjust the blade pressure to account for belt wear and tear.
Step 6: Review Performance and Make Adjustments
Periodically review the performance of the polyurethane belt cleaner. Monitor the belt for signs of wear or damage that might indicate the cleaner is too aggressive. Adjust the cleaner as needed to maintain optimal performance and prevent unnecessary wear on the belt.
By following these steps, you can effectively use a polyurethane belt cleaner to maintain the efficiency and safety of your conveyor system. Regular inspections and maintenance will ensure that the cleaner continues to operate at peak performance, ultimately saving you time and money in maintenance and repair costs.